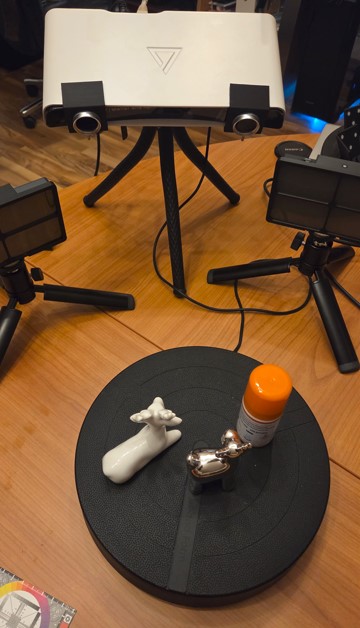
MAF3 with Cross Polarization Filter and external ligth
-
I have done some basic testing using cross polarization with MAF3.
I am using this for photogrammetry and to me this is the holy grail to get outstanding texture quality.
Cross polarization requires external lights where polarization between light and cameras are crossed by 90°.
This helps to reduce light reflection on the object (white spots). Especially for bright objects this can be big problem. Most professional photogrammetry experts are using DSLR with ring flash and cross polarization.
I am sharing this idea here in the forum to see if there is any willingness from dev team to support such expert features in the MAF3 software. It's not rocket science but HDR and use of external lights (with or without cross polarization) would require some processing options to make it easy to handle. At least running custom macro to define sequence of commands with different exposure setting for point cloud scanning and texture capturing would be needed.
Feedback and discussion about this idea .... welcome!
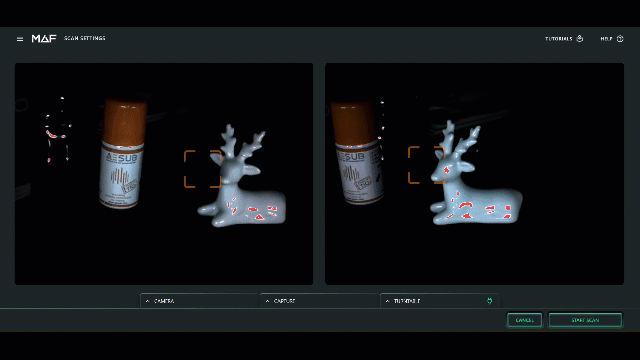
MAF3 and external lights equiped with polarization filter. Polarization from ligths and cameras are crossed by 90° to reduce light reflection a lot.
Without cross polarization lot of reflections visible!
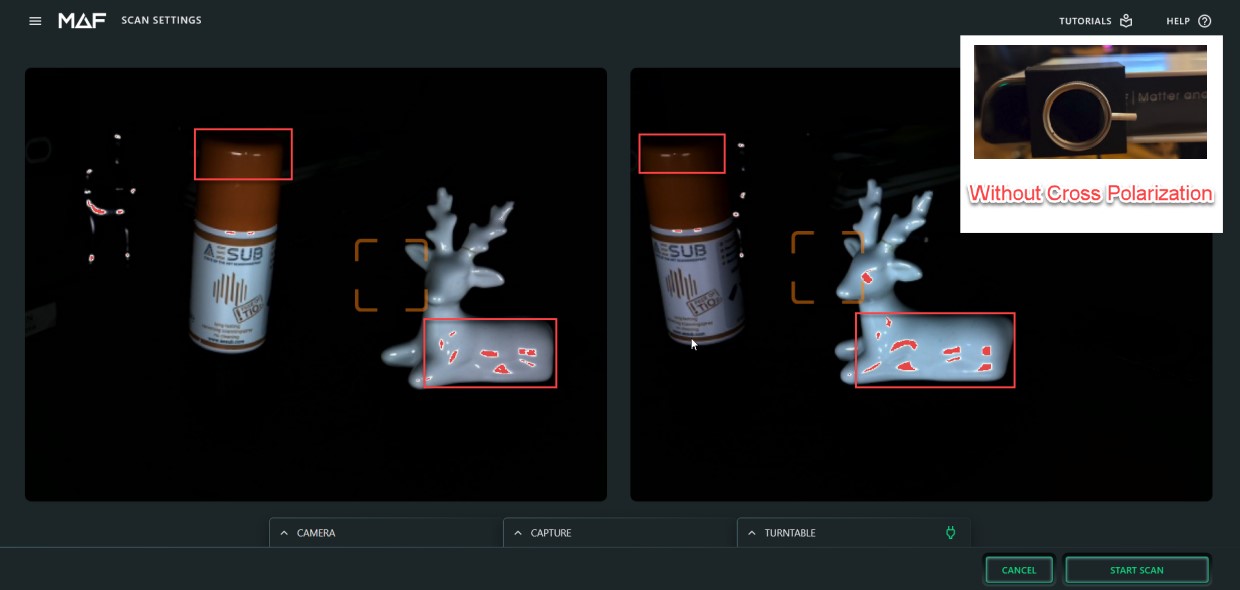
With cross polarization used, the reflections are reduced a lot ... almost completely eliminated!
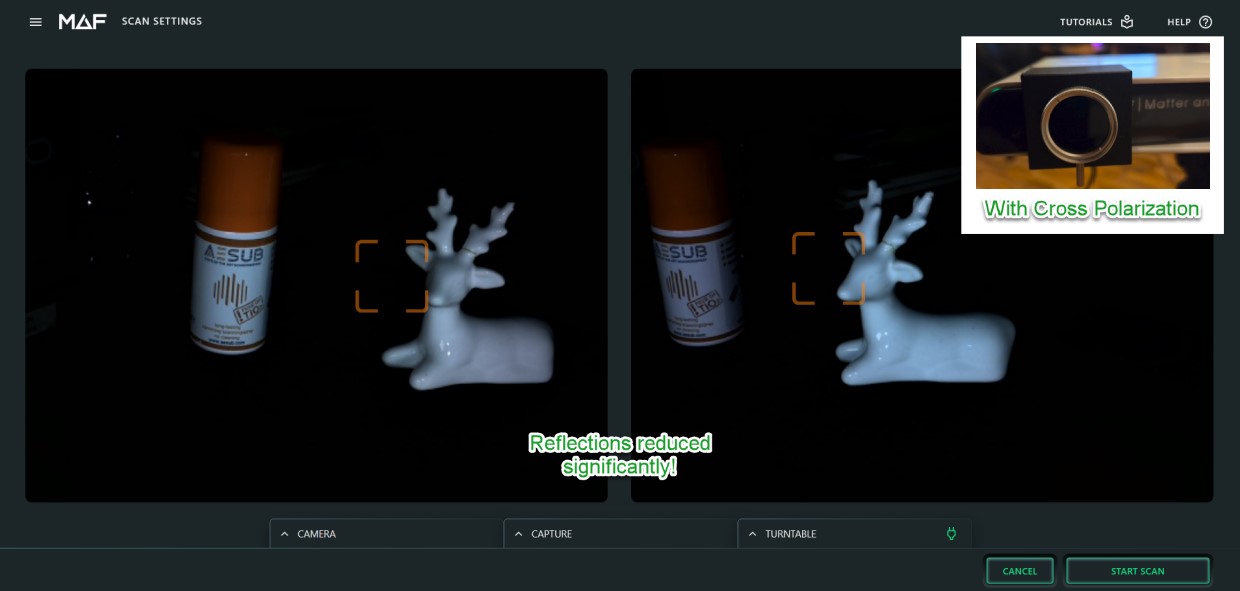
GIF animation is showing the difference when changing the polarization filter on the MAF3 cameras from non-crossed to crossed position.
I believe that use of external light (with and without cross polarization) and HDR support could boost the texture quality a lot and make MAF3 to a real differentiator compared to competition. The HW design from MAF3 supports such optimizations, but they will require some additional software support and updates. I am hoping to see support in later SW versions and to have some interesting discussions on the topic.
-
-
After some further testing i come to conlusion that HDR is absolutely mandatory for high quality texture capturing with MAF3 cameras. This is valid also when using additional external lights (e.g. photo box).
BUT ... when using HDR for texture with MAF3 cameras the image quality is outstanding! So much better compared to current implementation. It's must have feature to bring texture from MAF3 on next level.
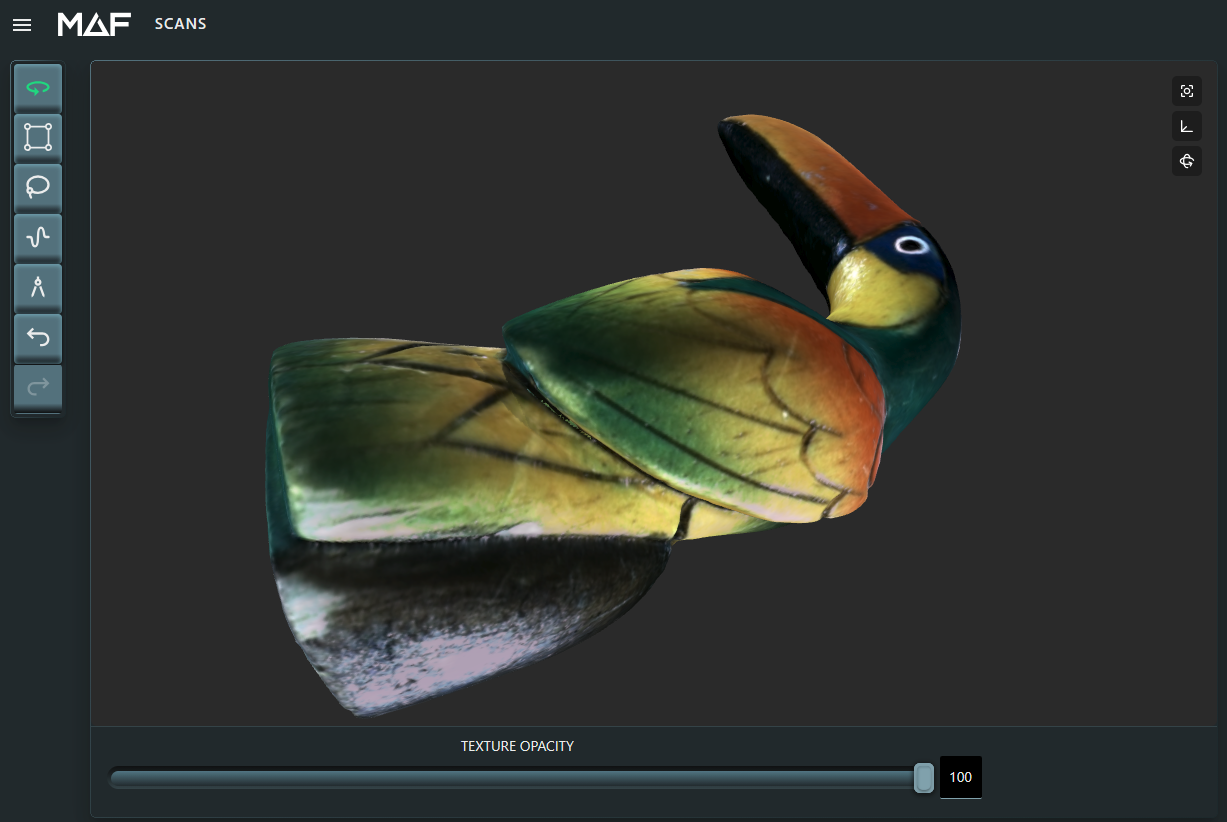
Texture quality out-of-the-box, without external lights, without HDR, without CP. Dark areas are under-exposed without lot of details. Increasing the exposure settings would lead to exceeding the saturation for white area because of low dynamic range of cameras.
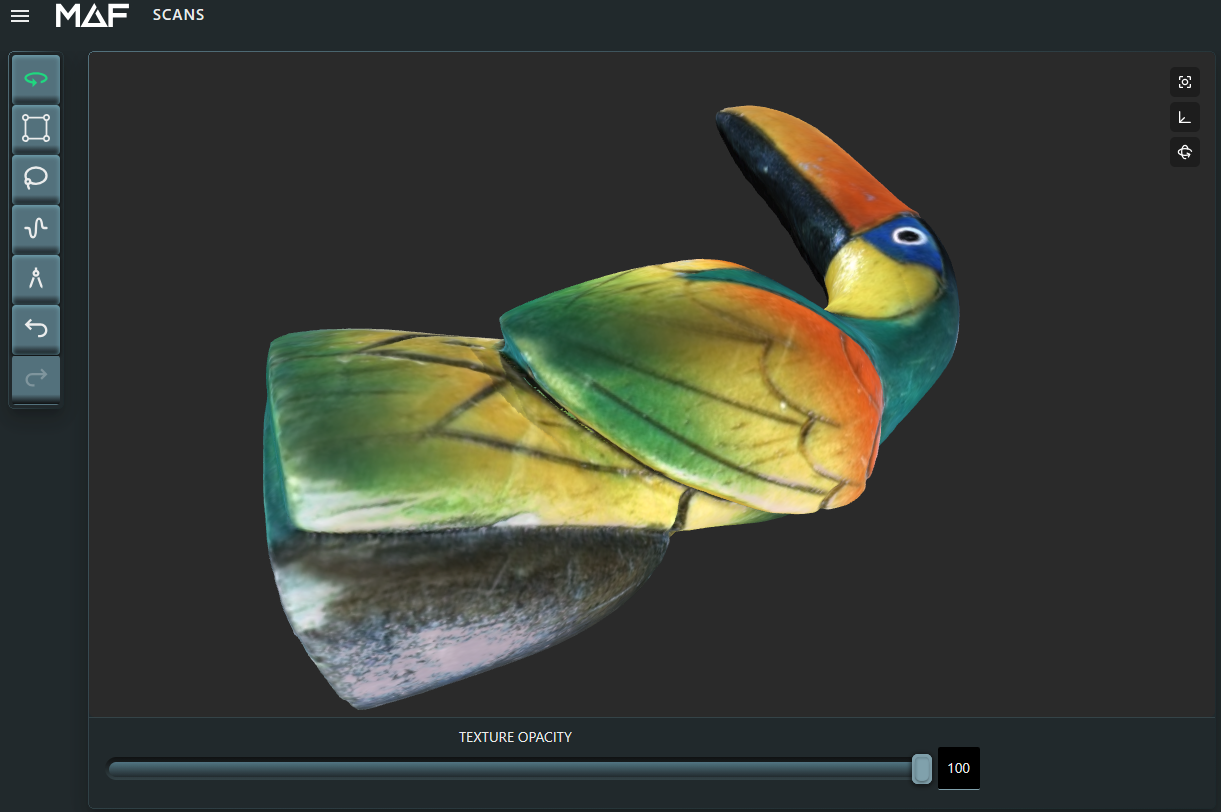
Improved texture quality with external HDR processing (3x images, normal/over/under-exposed), without external lights, without CP. All images captured with in-build MAF3 cameras. The texture quality is much better and the color range is increasing a lot. Also dark areas are showing lot of details. Drawback still are the reflections (white spots) because of quite shiny surface.
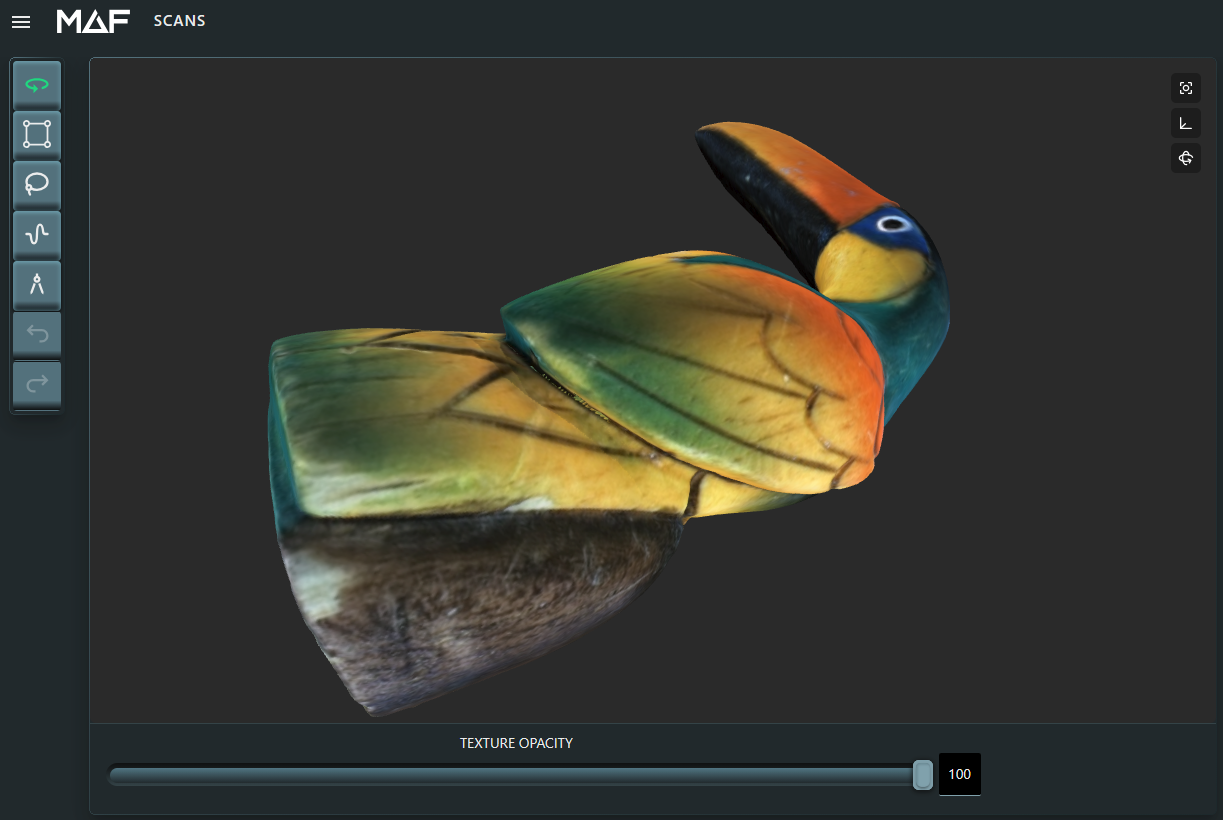
Further improved texture quality with external HDR processing + external lights + cross polarization. Polarization filters added on MAF3 cameras and crossed by 90° to external LED lights. The texture quality is almost perfect. Light and dark areas are showing lot of details and reflections have been almost eliminated by use of cross polarization method.
I think the results speak for themself?
It would be a big mistake to not implement HDR solution to MAF3 SW because the texture quality is improving a lot without changing anything on the HW.
-
-
-
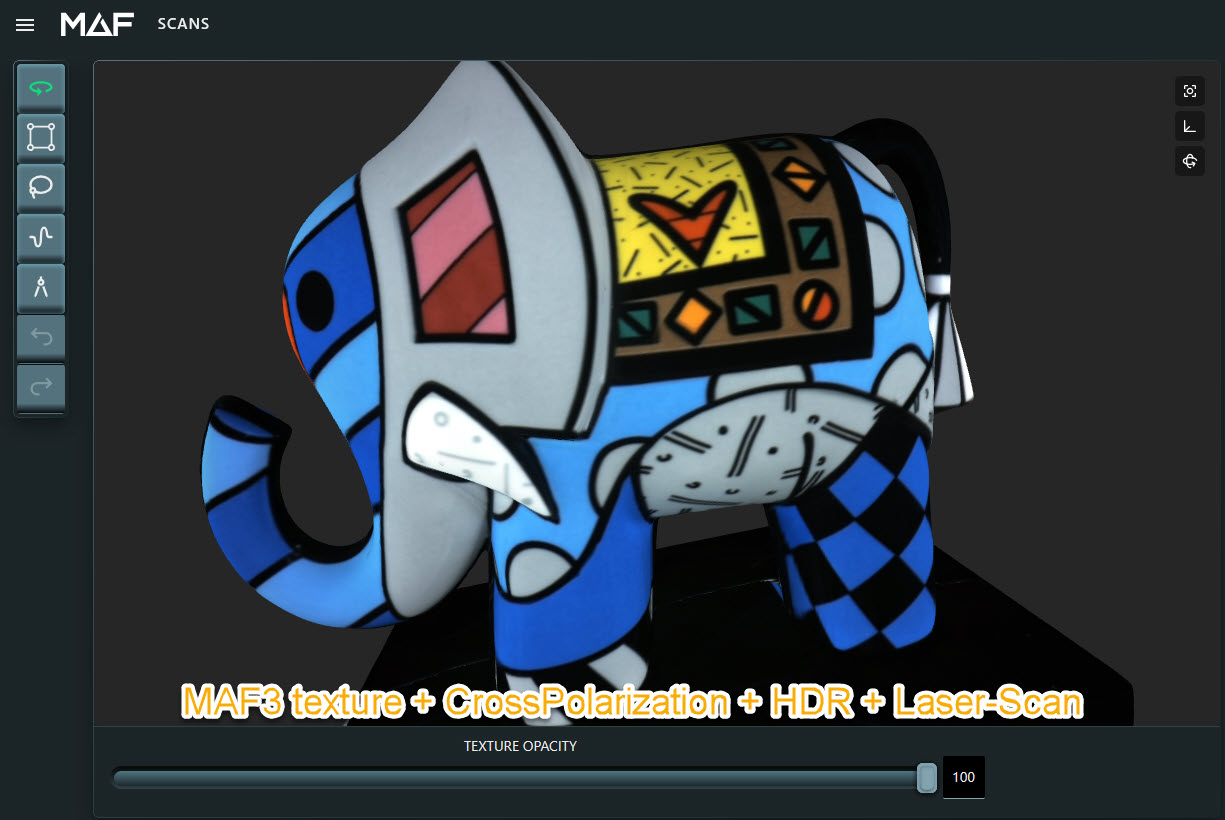
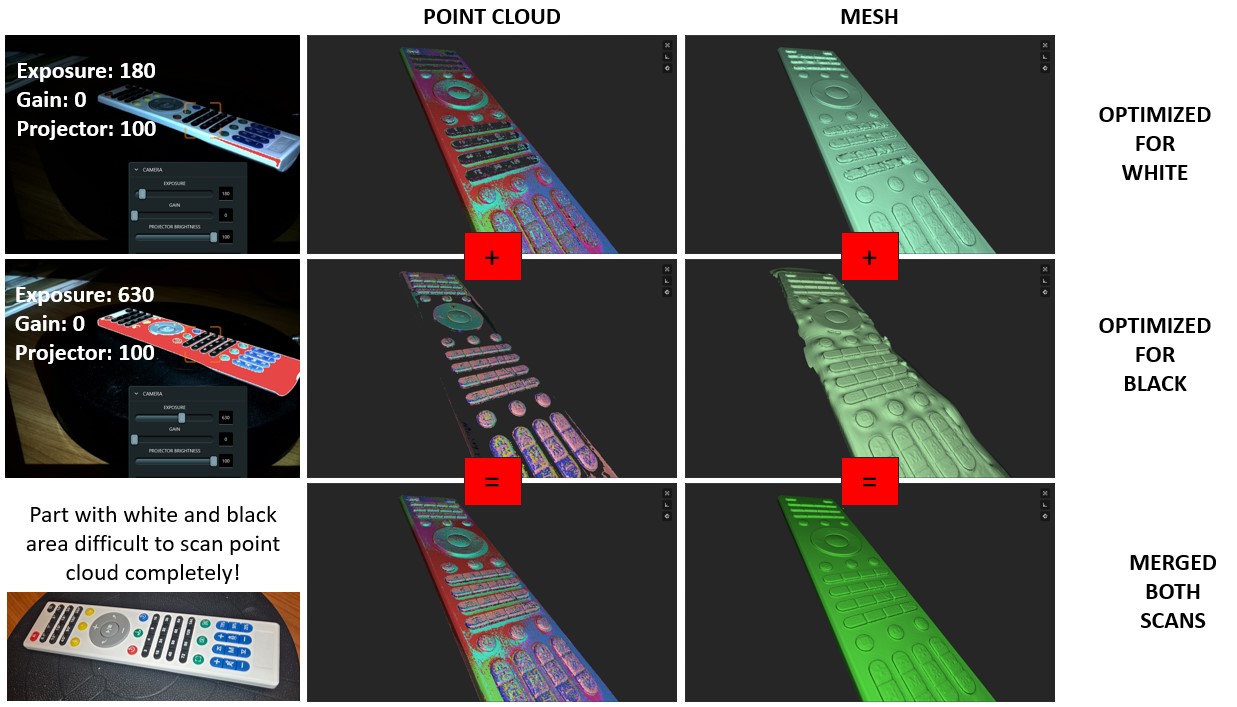
Another comparison of out-of-box result VS using CrossPolarisation + HDR + imported STL from laser scanner. Importing external mesh is to get best mesh quality because structured light scanner cannot scan shiny and black areas very well. It's optional but good to have this possiblity in MAF3 software.
The 3x HDR images are not perfect because some shift caused by inaccurate repeatability of turntable movements. Also some minor reflections caused by the projector which was needed to be removed in photoshop with minimal effort because the 3x HDR images must be captured with projector light to avoid "cannot triangulate points" error. I could not capture only texture images without need capturing also point cloud which does not allow to block projector light completely. Because of this issues mentioned it is mandatory to get SW support using this method using CP and HDR.
@MAF dev team: Are you willing now to support HDR method for texture capturing? Also makro based solution which can be customized by user appreciated.
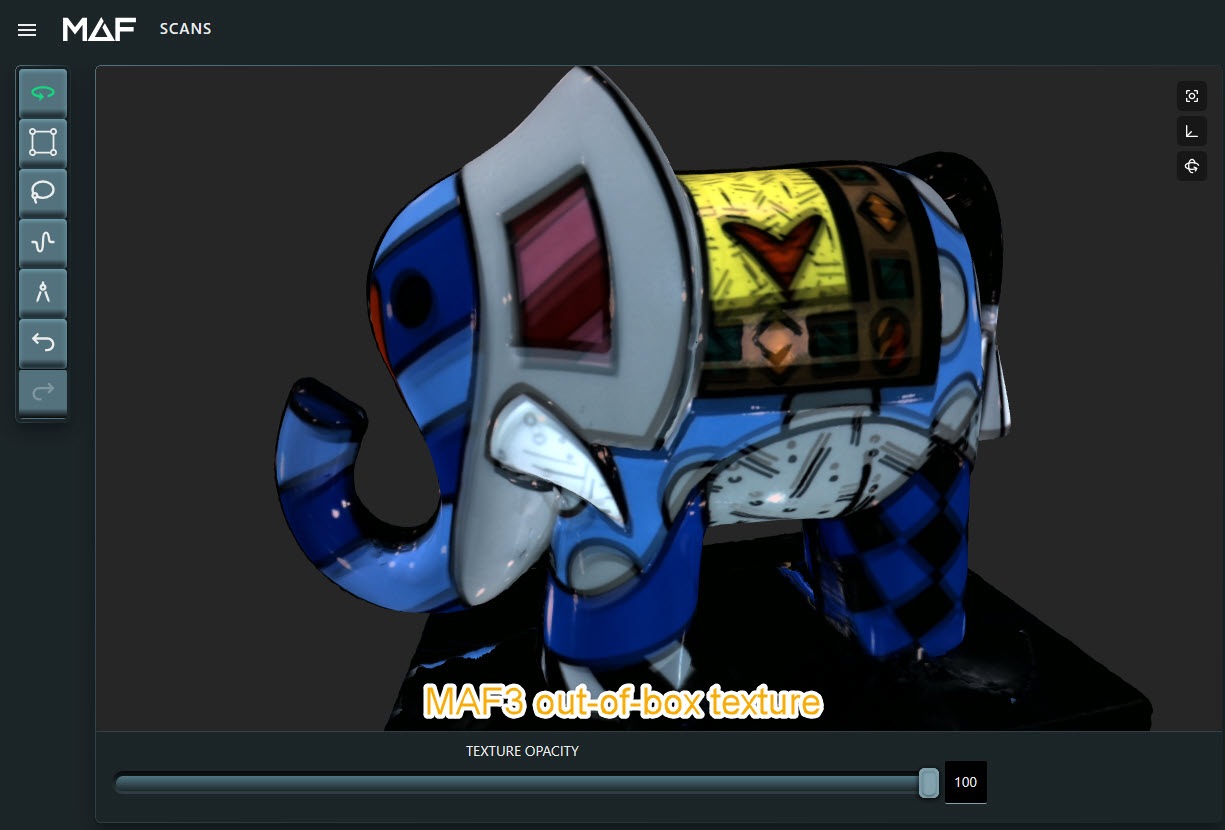
MAF3 out-of-box texture:
MAF3 improved texture using CrossPolarization + HDR + imported mesh from laser scanner:
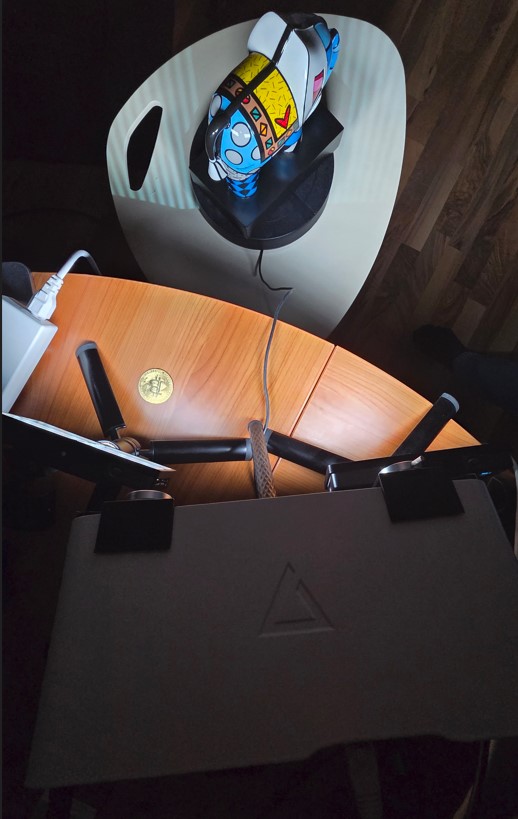
Setup using external ligths with cross polarizaiton filters on LED lights and MAF3 cameras:
Using this method would allow MAF3 to become unique 3d scanner with outstanding texture quality. With handheld scanner this is almost not possible to use this method. Comments welcome!
-
-
-
-
-
@Tom Meeks The reflections on glossy objects can be eliminated best when using external lights with cross polarization on lights and cameras. I also would like to have option to switch on/off the lights with MAF3 and for this simple HTTP GET request could be used. This could be arduino wifi switch (many such code available) but also commerical HW like Shelly Plug or Shelly Relay, Snoff Wifi Switch or ESP-01 and many others. Beside switching the external lights the polarization filters could be moved with simple slider in front (and back) of MAF3 cameras. This would allow to have full light sensitivity for scanning the point cloud. At least this option for this non-plus-ultra solution would be given by such feature in MAF3 software.
@Drew Shark Here my proposal for the implementation of HDR and external ligth switching. Beside this i think it would be also good to have option for 2nd point cloud scan with different exposure settings. This would be "HDR Lite" solution for the point cloud scanning. For point cloud scan just the points from both scans should be merged into one. It's simple but very effective and also other structured light scanner on the market are doing it like this. Both improvements for point cloud scanning and HDR for texture will boost the performance from the MAF3 a lot! Based on the testing i have done manually it can deliver outstanding results. Almost not possible with handheld laser scanner. ;-)
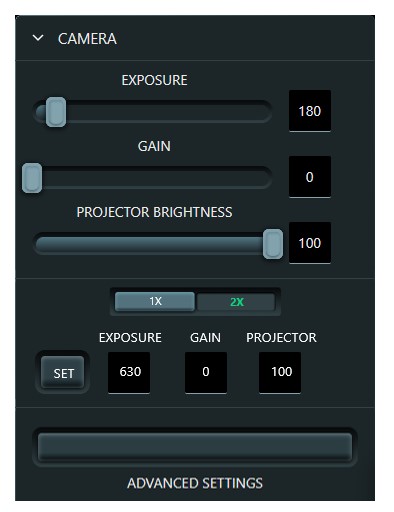
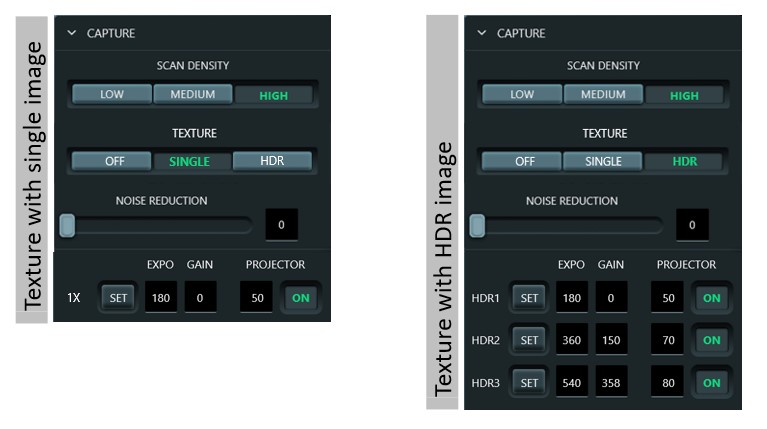
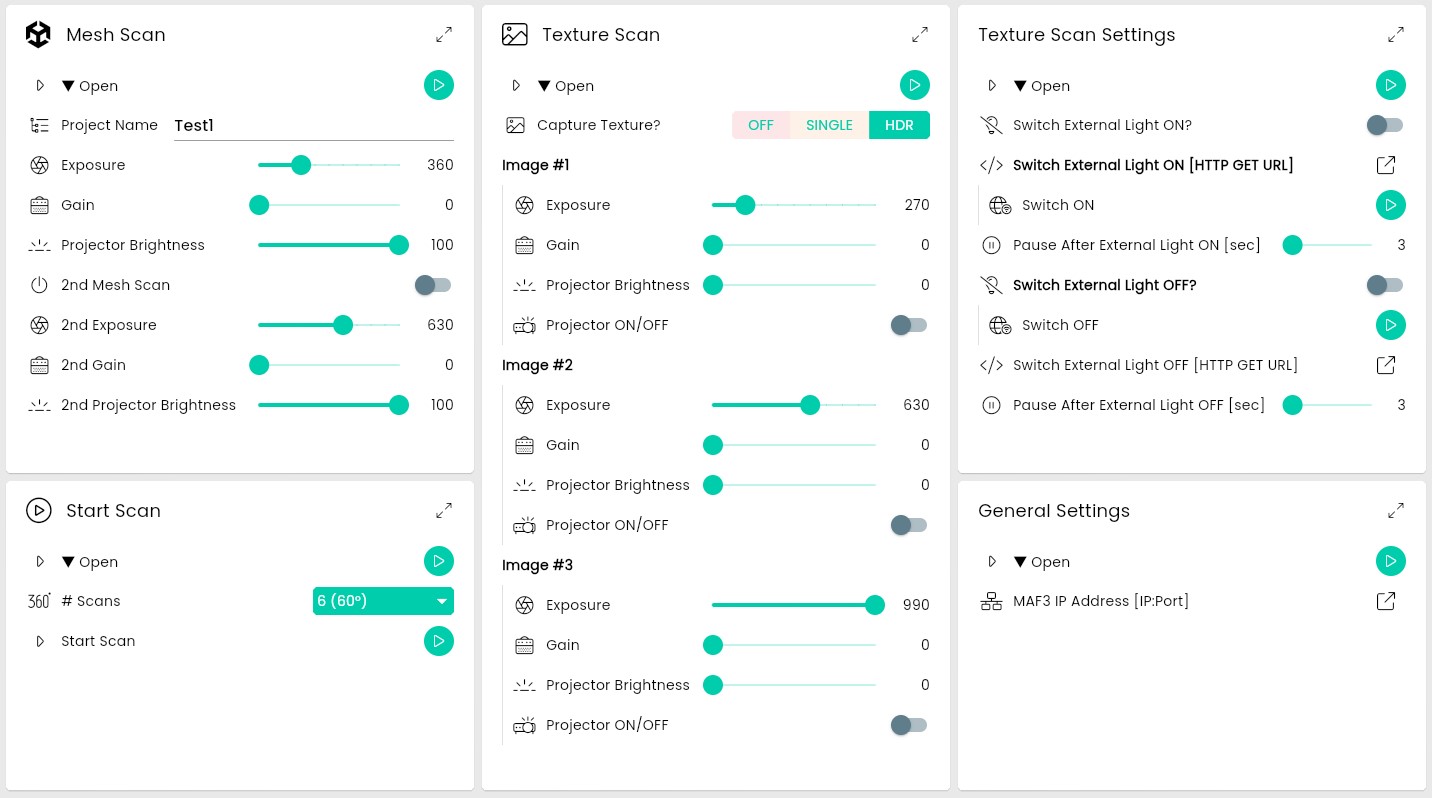
PROPOSAL FOR 2nd SCAN OPTION TO CAPTURE POINT CLOUD (HDR Lite)
TESTING:
GUI IMPLEMENTATION PROPOSAL:
PROPOSAL FOR HDR TEXTURE
GENERAL SETTINGS & PROCEDURE (for external light switching with http get command)
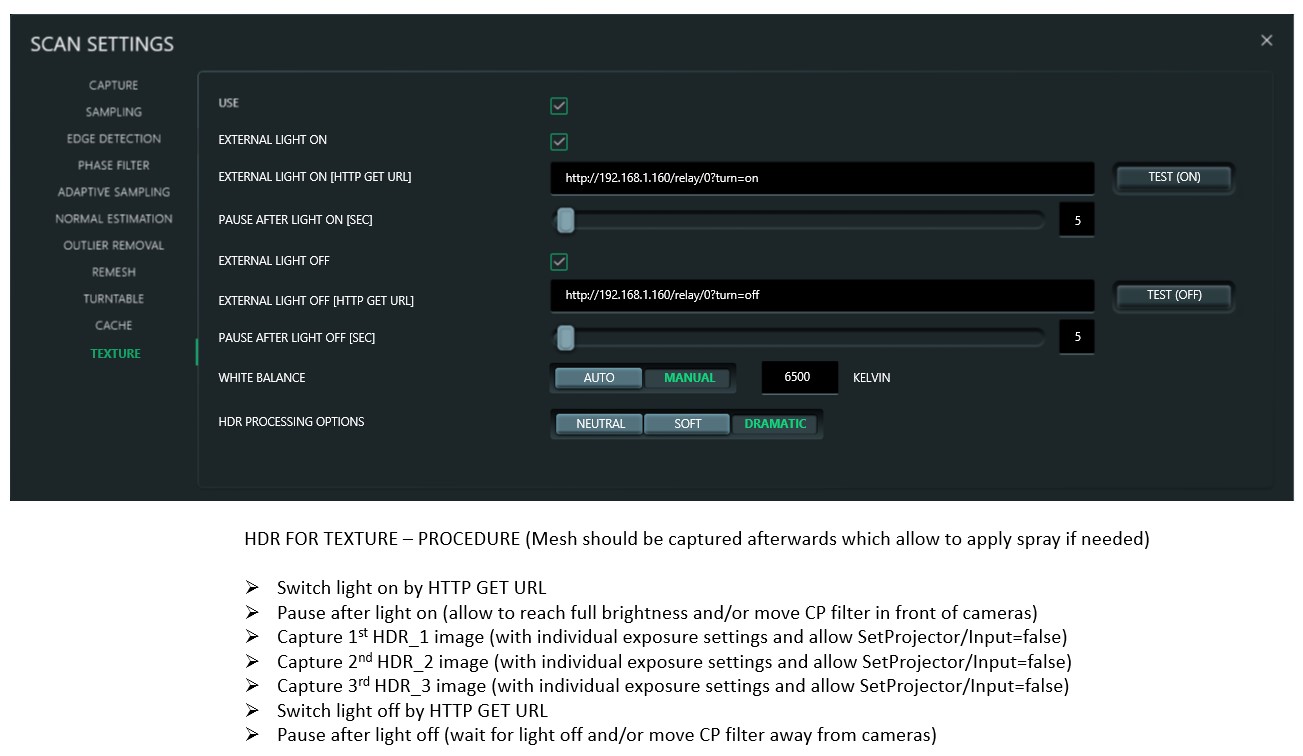
GUI IMPLEMENTATION PROPOSAL:
I know that this will be quite a lot of work to implement but it will allow to fully exploit the potential of the MAF3. Everything which is requested here is "doable". This is just a first proposal and other implementation might be more useful.
Looking forward to your comments and questions regarding this proposal.
It would be amazing to get those features! Not only for me, also for many others!
-
-
-
I have uploaded the "experimental" filter on Makerworld which can be downloaded here:
https://makerworld.com/de/models/2249701-cross-polarization-filter-round-maf3-3d-scanner
https://makerworld.com/de/models/2249732-cross-polarization-filter-square-maf3-3d-scanner
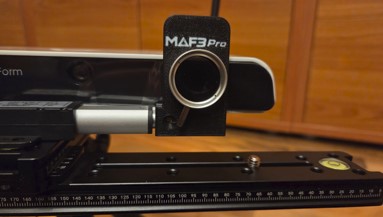
I am currently working on improved motorized version and testing version looks like this:
@Drew Shark What about implementation of above GUI proposal? Idea could be also to have seperate professional mode menu which needs to be entered or activated (maybe licenced?) in the settings to not confuse normal users by to many options.
-
-
-
-
-
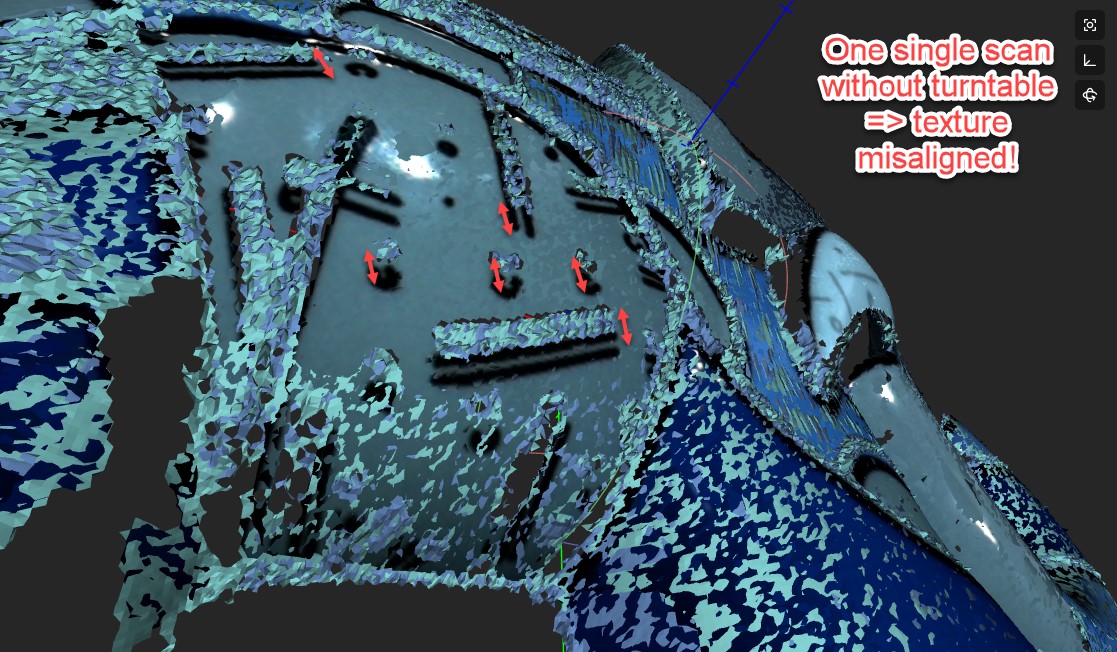
@Trevor Townsend I have checked the elephant scan again and the reason of the texturing comes from the fact that texture from single scans are not aligned correctly. Issue reported also here. I hope it can be fixed soon.
Meanwhile i have completed the implementation of my proposal above with custom API solution on my home automation server. Everything already fully functional. Texture can now be captured with individual exposure settings. Texture with single image or 3x captures for creating HDR image. Beside this projector can be switched off completely for texture because this was causing reflections even when set to zero because still some light is emitted. And external light is automatically switched on/off & plarization filter is moved in front of left camera when texture is beeing captured.
For the lights i am still thinking if it will be ringlight or LED panel. Or both.
-
- 1 / 2
- 2